.blog-menu-desktop ul {
background-color: #F1F1F1 !important;
width: fit-content;
float:right;
}
.blog-menu-desktop li {
display:inline-block;
font-weight: 600;
padding:0 15px;
vertical-align:text-top;
}
.blog-menu-desktop li a {
color:#000000;
}
.blog-menu-desktop li a:hover {
color:#E00519;
background-color: #F1F1F1;
}
.selected_category {
color:#E00519 !important;
}
.separator-border {
border-left:2px solid #000;
height:15px;
display:inline-block;
}
#misterworker-blog-menu .btn-primary:hover{
background-color: #e00819;
}
#misterworker-blog-menu-content ul {
background-color: #e00819;
padding: 10px 20px !important;
}
#misterworker-blog-menu-content ul > li {
margin-bottom:5px;
}
#misterworker-blog-menu-content ul > li > a {
color: #fff;
}
#misterworker-blog-menu-content ul > li > a:hover {
background-color: #e00819;
}
What is a micrometer and how is it used? Interview with TESA Technology
Published :
04/6/2020 09:19:37
Categories :
Mister Worker
, Professional working tools guide

Today on the Mister Worker™ Blog we are in the company of TESA Technology to talk about a precision measuring instrument: the micrometer.
What are micrometers? How to use a micrometer?
The micrometer is an instrument created for the dimensional measurement of mechanical parts characterized by high precision. Like the caliper and some other bench tools, it is considered indispensable for machine tools operators. Unlike calipers, however, its particular mechanical construction guarantees very precise measurements, with resolutions up to 1 micron. 1 micron or micrometer corresponds to one thousandth of a millimeter and is indicated by the symbol µ.
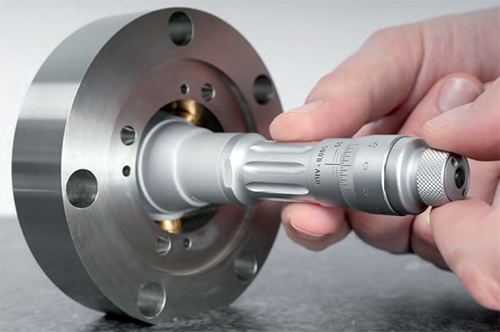
There are essentially two families of micrometers: one for measurements of external dimensions and one for internal ones. The external micrometer is a linear measuring instrument, consisting of an arched frame where there is a fixed anvil on the left and a movable spindle on the right, composed of a graduated thimble inside which a micrometric screw is positioned. By rotating the thimble, the screw, which represents the heart of the instrument, advances. Instead, in internal micrometers the micrometric screw is attached to a cone, smooth or threaded, and its movement spreads 3 measuring contact points.
Within these two families we find analog or digital models, with contact surfaces of various types (flat, round, lowered, disc, with inserts), which make them versatile tools for various part geometries. For internal models, different construction features determine the possibility of being able to measure both blind and through holes.
Some of the main areas of application are the automotive sector, aeronautics and precision mechanics. These instruments are used both in the production environment and in metrology rooms or laboratories.

How to choose a micrometer?
When choosing a micrometer, the first parameter to consider is related to the need to make a measurement characterized by high precision. This determines the choice of the resolution of the instrument, which depends on the manufacturing tolerances required by the drawing of the detail to be checked. Other parameters to be taken into account are the measuring range, the evaluation of the geometry of the part to be measured and the type of reading, analog or digital, that you want. This last choice is also linked to a possible management of the collected data, as well as to the practicality and ease of its reading.
Which are the regulations to consider before buying a micrometer?
There are various UNI, ISO and DIN standards that regulate measuring instruments in general and establish the most important functional and quality characteristics. TESA micrometers meet specific construction and precision standards. The standards in question are DIN 863 T1 (NF E11-095), DIN 863 T3, DIN 863 T2 and DIN 863 T4 (NF E11-099). Depending on the type of instrument for internal, external or depth and analog or digital execution, these standards characterize the construction aspects and the maximum accuracy errors allowed.
The UNI tables, on the other hand, show the recommended methods for checking micrometers and establish the operating procedures, indicating the equipment necessary to carry out the calibration.
What are the maintenance and calibration specifications for TESA micrometers?
Regardless of their constructive robustness, measuring instruments must be handled with some caution. These tools are used in environments that, in most cases, are not very clean, just think for example of their use in the workshop on the machine. Before being stored in their case at the end of use, they should be cleaned of any presence of oils, greases and other agents. Periodically it is also recommended to check their mechanical parts. Dimensional checks can be carried out directly by the customer using a setting master such as gauge blocks, setting standards, cylindrical gauges or setting rings; the choice of instrument depends on the type of micrometer and all these accessories are part of the TESA catalog. As for any repairs, calibrations and dimensional certifications, it is advisable to make use of the parent company or authorized service centers in the area.

In the market of micrometers, how does TESA Technology stand out from competing brands?
Certainly, from 1941 up until today, a parameter that has always distinguished TESA products is the high quality. This aspect ensures that all TESA instruments, and in this case the micrometers, are very precise, reliable and long lasting. The micrometric screw, which constitutes the heart of the instrument, is grinded with extremely high precision and this allows us to obtain extremely low measurement uncertainty.
There are also construction features covered by registered patents such as, for example, the TESA CAPA µ SYSTEM® digital reading system, very reliable and easy to interface with a computer.
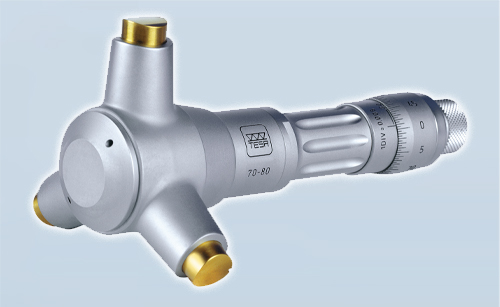
Another exclusive TESA patent is the IMICRO® internal micrometer mechanical system with three contact points, which makes it unique and still unmatched to this day.
Among the various special designs of TESA external micrometers, I would also mention the models with integrated comparator MICRO-ETALON 225 and the MICROSPEL, which instead offers the possibility of mounting an electronic probe. Both models are suitable for series measurement of small parts, they are quick and very precise.
Furthermore, the great majority of our micrometers is supplied with a measurement report with reference to primary samples, which certifies the conformity of the instruments to the stated technical specifications.
Which are the top models in the TESA Technology micrometer range?
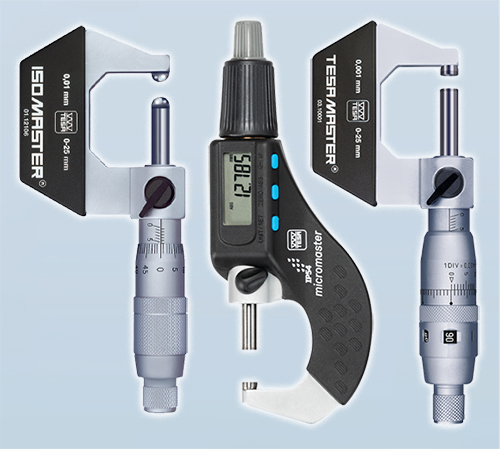
In the category of external micrometers, the leading instruments are certainly the standard versions of ISOMASTER® and TESAMASTER® for analogue models and those of MICROMASTER® for the digital variant.
Speaking of internal micrometers, IMICRO®, available in both analog and digital versions, is certainly one of the flagships products of TESA, as well as an highlight of the entire TESA production.
Can you better explain what are the technical peculiarities that make IMICRO® so unique?
IMICRO® is an internal micrometer with three points of contact with a patented measuring system, truly unique, and its mechanical principle comes close to perfection. Invented in 1950, it has often been copied, but never equaled.

Its main features and the advantages are the following:
- The measuring head consists of a measuring cone in ground hard metal which, unlike the standard models where it is smooth, has a particular profile, which we could define as “threaded”.
- Together with the cone, the studied arrangement of the 3 contact points makes IMICRO® the only internal micrometer in the world that respect the Abbe principle. This principle states that to obtain the maximum measurement precision, the measuring point on the part and that of the instrument must be aligned on the same axis.
- The arrangement of the measuring anvils that are 120° apart and their particular geometric shape guarantee the self-centering and self-alignment of the instrument in the hole to be measured, regardless of the operator’s sensitivity.
- The ratchet, integrated in the rapid advancement, guarantees a constant measuring force.
- The mechanical construction peculiarity reduces the influence of temperature variations on the measurement by 4 times compared to other similar standard products.
- The surfaces of the measuring contacts, coated with titanium nitride, are very resistant to wear and therefore guarantee reliable measurements over time.
- The possibility to add extensions with lengths up to 1000 mm allows the use of the instrument even in very deep holes, guaranteeing an excellent quality of measurement.
What innovations does TESA Technology offer in the precision measurement sector?
We can say that for TESA the external micrometer represented a real milestone, having been the first measuring instrument produced in 1941 when, at the birth of the company itself, MINMETAL® was invented. Subsequently, the micrometers also marked other important stages in the history of the brand.
With the TESAMASTER® model, TESA has created a micrometer which combines high precision mechanics with an analog and numerical reading system, which makes it unique today.
With the MICROMASTER® digital series, TESA has introduced a completely innovative instrument on the market, both from a design and from an electronic point of view, supported by the patented capacitive level measurement system CAPA µ SYSTEM®. It is no coincidence that it was said that TESA has “reinvented” the micrometer, demonstrating all its know-how by introducing innovations also in classic products.
The latest innovation proposed by TESA is represented by the new “plug and measure” TESA TLC-BLE connectivity solution, also applicable to all our digital micrometers, as well as to the vast majority of TESA digital instruments. Since the centralization of data and its accessibility in real time is a fundamental challenge in the race for productivity, our system represents a great simplification in the field of connectivity, in an era in which this has become essential. Today’s market demands are increasingly moving towards a simple, connected and economic metrology. In our case the simplification is both at the hardware and software level: all our digital micrometers can be equipped with a Bluetooth® transmitter to send the measurements to an ultra-simple free software, TESA DATA-VIEWER, which acts as a bridge between the instrument and a simple Excel sheet or other more or less complex data processing software, to allow, among other things, the automatic creation of reports or SPC statistical analyzes in real time.


